Tuesday, July 27, 2010

Bathroom Floor Tile

Today I installed the floor tile in the half bath. It literally took me all day to measure, cut, and install the tile. Cutting the tile was actually fun, thanks to the tile saw we borrowed from my Grandpa Bill. It was really easy and the cuts were perfect.


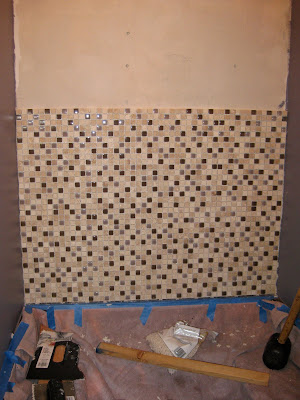
The hardest part was laying all of the tile without stepping on the ones that I already put down. To make sure the tiles were evenly spaced in the room, I had to start in the middle. If you can see the tile with the blue spacers laying on it, that is the one I started with. I then put down the tile above it, and worked my way to the left. Anyway, It was hard!
Kent and I were worried that the tiles would not be even, but I was able to get them pretty close to level. I tried really hard to follow all the directions and get the tile installed properly, but I am still worried they will crack. I guess we will just have to wait and see.


The room is really starting to come together.

Thursday, July 22, 2010

More Tile

I spend a lot of time today putting the remaining tile on the wall behind the vanity. I still need to grout and do some touch up painting, but I had to take more pictures!

Once I put the mirror up and get the faucet installed it is going to look great!


Here is the next issue I have to tackle. When I put the grout down, I don't want to fill the holes in the actual tiles. Not sure of the best way to achieve this, but I am sure the internet will provide me with some guidance.

Wednesday, July 21, 2010

Tile going up!!

Here is a quick update on our bathroom remodel. We order new tile, which took a long time to come in. While waiting on the tile, I painted and put up the new light. Below are some pictures.

Our new light! A major issue with the old bathroom is that there was no light over the sink. We decided that a track light was an easy solution to this problem. While shopping for lights we realized that a lot of track lighting looks dated. We also realized that the electrical for the light was not centered in the room. All our problems were solved when we found this light. This picture is looking toward the sink wall. The other end of the light only has two globes, fixing the not centered problem.

I finally started putting up the wall tile today!! Remember, this is the wall behind the sink. I covered the vanity with a towel to protect it, but the tile looks great with the marble vanity! I have only put two rows of tile up, and have three left. Its really exciting!

Close up of the tile. Can you tell where the seams are?? (If you can don't tell me). I went to Home Depot to buy tile spacers, but they did not having any that were the right size. I bought some and tried to make them work, but I had to eye-ball it in the end. I think I did a pretty good job for my first time!
I am not sure why, but some of the glass tile are tilted. They were like this before putting them on the wall, so I am trying to be happy with it.


Here is a close up of the problem we are having with the size of the tile. There is a gap between the tile and the side wall. The gap looks rather large here, but in reality it is a little larger than the space between the tiles. I placed the tile so there is a similar gap at the other wall as well. Once I get the grout in I am hoping the gaps will not be as noticeable.

What I have learned: Tiling is hard!

Friday, July 2, 2010

Bathroom Decisions

Kent and I finally got our marble countertop in for the half bath remodel. It is a gorgeous marble and we love it, but now we are doubting the tile that was our inspiration for this whole project. Below are a few pictures of the tile and the countertop.
Here are a couple of things to keep in mind: We will have a 4" marble back splash on all three sides of the countertop. The tile shown in the picture will be placed all the way up the wall behind the sink (if we decide to use it). This wall will have a mirror on it.
We have chosen a floor tile that is a light travertine. It matches the light stone in the wall tile.


In this picture the tile is still wrapped in plastic (in case we need to return it).

So, we are trying to decide whether we should go with the tile in the photos or a small version of the floor tile or just paint the wall or something else.